How To Draw A Cube In 2 Point Perspective
How To Draw A Cube In 2 Point Perspective

Two Point Perspective

Two point perspective is the more commonly seen perspective. Like the name says, instead of the single vanishing point use d in one point perspective, you use two vanishing points. These vanishing points will always be located on the Horizon. Each object in a drawing may have its own set of vanishing points.
Let's work this time on line quality as well. To do this we first will draw lightly, especially the lines radiating from the vanishing points. Not so light they're difficult to see, but they still should be light enough to completely erase without residue. This will make it easier to keep track of the truly important shapes in your drawing. By going over the important areas a bit harder, they will stand out and attract your eye.
Draw a Square using Two Point Perspective

-
Place a Horizon line and mark 2 Vanishing Points fairly far apart on the horizon line.
-
From one of the Vanishing points, extend a line below the Horizon to a point near the midpoint
-
From the Same Vanishing Point, extend a line somewhat above the line you just drew. Once near the midpoint of the paper, they should be separated roughly an inch or so.
-
Do the same procedure from the other Vanishing Point. The Lines should cross to form a diamond shape.
The shape of the diamond depends on how far apart the lines spread as they diverge from the Vanishing Point, it can be narrow or wide. Notice the difference between a Square using Single Point Perspective and Two Point Perspective.

One Point Perspective

Two Point Perspective
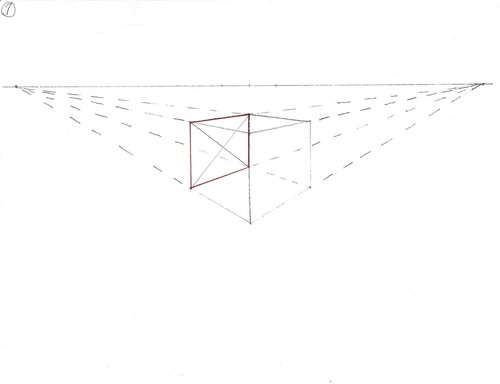
Now in that box mark the diagonals to find the center-point.

Once you have the Center Point, Draw a line from the Vanishing Point through the center-point to the opposite side of the box.
 Unlike single point perspective, where the center line was vertical, in two-point perspective, the center lines are drawn from the vanishing point. In both cases, the center line originates from the vanishing point. The Red line runs from the right vanishing point through the mid-point on the side, through the middle of the square and then to the mid-point on the opposite side (where the arrow is). The Blue line does the same thing, and ends up dividing the larger square into smaller squares.

Two mid point lines divide the larger square into smaller squares
Draw another square using the same two Vanishing Points, mark out the square as you did in one point perspective and draw an ellipse. If you need a refresher, go here, otherwise the process in a nutshell is to draw a line across the square from corner to corner, from each vanishing point to the center of the X as viewed above, draw a line (breaks the box into four equal squares). Next, below you see some pale yellow lines joining the mid-points on the sides. Following that, make a small tick mark half-way from the corner to the pale yellow line, and draw an arc just shy of that mark. Continue around, and you have an ellipse (blue). Depending on how narrow or wide your square is will determine the shape and size of the ellipse – so yours may look quite different than mine.

Drawing a Cube using Two Point Perspective
In this case, we want to be able to measure the sides of the cube, so we will do this a bit differently. Here we need to place a "scale" under the area we're drawing so we can end up with a cube rather than a rectangle. In most drawing this won't be necessary but it is a great bit of knowledge you can use to draw things which are of a certain dimension… such as a chest of drawers, a rectangular building, or a table. This will allow you to scale these to a certain dimension. Once again, remember to lightly draw the portions which are listed here, we will reinforce those lines we need later.

-
Draw a horizon and place 2 Vanishing Points at either end, label the LEFT one VP(a) and the RIGHT one VP(b)
-
Mid-point between VP(a) and VP(b), draw a vertical line straight down 1 1/2" Label the end not on the Horizon "0"
-
Draw a base line parallel to the horizon at Point 0
-
Mark out 3 points 3/4" from Point 0:
-
Point A on the Base line to the LEFT of Point 0
-
Point B on the Baseline to the RIGHT of Point 0
-
Point C on the Vertical Line above Point 0
-
Mark out two points on the Horizon ¼ inch equidistant from the vertical line.
-
Measuring Point (B) [MP(B)] to the Left of the Vertical Line,
-
Measuring Point (A) [MP(A)] to the Right of the Vertical Line.
-
Establish the bottom and top of the cube
-
Draw a line from VP(B) to 0
-
Draw a line from VP(A) to 0
-
Draw a line from VP(B) to C
-
Draw a line from VP(A) to C
-
Mark the length of the sides:
-
Dash a line from MP(B) to Point B, where it intersects line VP(B),0 label as Point E.
-
Dash a line from MP(A) to Point A where the dashed line intersects with line VP(A),0 Label as Point D
-
Establish the sides of the cube:
-
Draw a vertical line from point D to line VP(A),C and label the intersection Point G.
-
Draw a vertical line from Point E to line VP(B), C and label the intersection point F.
-
Complete the top of the cube:
-
Draw a line from VP(A) to Point F.
-
Draw a Line from VP(B) to Point G

-
Establish the bottom of the cube:
-
Using dashed lines, Connect VP(A) to Point E
-
Connect VP(B) to Point D
Some things to notice…
-
The horizontal line parallel with the Horizon is a scale to allow you to draw a cube. By using the measuring points and the scale, you will be able to draw a perfect cube. You could also draw a rectangle or other proportional thing using this scale. Otherwise you are just guessing the distances needed to make the drawing correct. For example a glass looks like it is 2 times taller than wide, it is easy to do a perspective drawing of the glass and have the shape come out correct.
-
The closer the Vanishing Points are to one another the more distorted the shape is. For some subjects the perspective may require the Vanishing Points to be located off the page.
-
The location for the measuring points isn't very important, as long as they're located on the Horizon Line and equidistant from the center line.
This isn't the only place you can draw a cube. This method works only for a cube or block located on the mid-point of the Horizon. The main purpose of this exercise is to see how a completely perspective correct cube will look. You can also move the Cube closer to one of the Vanishing Points, when you do, you should make the opposite Vanishing Point even farther out to prevent distortion.
Draw a cylinder on a cube using Two Point Perspective.
You can print out the master copy, so you can follow along with this exercise. On each slide the new parts will be shown in RED.

Ready? Here we go!
Place the Diagonals from corner to corner.
Place the horizontal and vertical lines (using Vanishing Points). The way to figure out which vanishing point to use, is to think about the side you drew the top line and bottom line from… the "V" from the vanishing point in this case is from the right side of the picture. As in all one and two point perspective, the vertical lines stay vertical… since the vertical lines are not receding towards the horizon, they don't need to be dealt with using perspective rules.

Make a new square using the mid-points on the sides – these are the mid-points in perspective so if you measure, you'd notice the top and bottom where the line intersect isn't exactly halfway across. Never-the-less, the line is in the correct position. So we're going midway from one side to midway on the next side.

Here we complete the square within the square. It looks like a red and gray diamond.

Make a 'tick' mark (point "C") at the halfway point between corner of the cube (point "A") and where the intersecting diagonal line and the purple line (point "B") . Note the other tick marks on this face of the cube in orange color.

draw in the Arc's for the Ellipses (circle in perspective). Remember to keep the arc's just shy of the tick marks. They shouldn't ever touch the tick marks, but should gracefully sweep around from the mid-point on the side to just shy of the tick marks and again touch the mid-point along the side.

Now let's draw the back part of the cylinder. The back of the box is outlined in Red.
The same vanishing point is used because it is in the same plane as the front. The back plane of the box originates from the right vanishing point, so we need to use it for making our "horizontal" division of the box. Note also the vertical line is still vertical.
.
Now we join the mid-points to make the "diamond". The diamond lines really just cut the intersecting diagonals (the "X") in half.

Now let's do the same steps as before, make the tick marks on the intersecting diagonals half-way between the corners and the diamond diagonal.

Draw the arc's for the ellipse.

Here are both ellipses drawn. The other was left out for ease of viewing what steps were taking place on the back box.

Now we join the sides. You can draw a line through the tallest portion to the LEFT vanishing point. This method is used to correctly orient the ellipses to the ground plane. If you notice, the longest portion of the ellipse, known as the long axis, isn't vertical as you might guess, there should be a tilt to it, and in fact, there is. The long axis runs along one of the intersecting diagonals, and the short axis runs along the other one.

Drawing a Sphere in One Point Perspective.
This complicated bit of drawing is easier to sort out if you look closely for the horizontal ellipse at the mid-line of the cube. This line could also be referred to as the equator of the circle. So the first step here is to draw the intersecting diagonals on the side of the cube and connect them. This will give you a square running horizontally through the middle of the cube. Construct the mid-horizontal plane ellipse (equator) just as we have done throughout the exercises.

You next make ellipses on the Diagonals the vertical edges of the intersecting diagonals. The boxes you make on the intersecting diagonals will be located on the rim of the horizontal (equator) of the circle.
If you draw both diagonals ellipses you end up with three ellipses – the horizontal ellipse, the two vertical ellipses drawn on the horizontal ellipses' intersecting diagonal. To finish the sphere, make an arc starting on one of the sides (Left or right) and arc up to the ellipse drawn on the diagonal then to the "North Pole" of the sphere on over the top to the equator again. Continue around join the lower portions together to draw the sphere. You'll find the diagonal ellipses project farther out than you might think. Just as you did when you created a circle, you will arc the line (circumference) to these edges.
Note : the Sphere extends past the Center-point on the bottom edge. This is important. Closely notice on round objects you aren't seeing exactly one-half of the object.
Again, the only way to get good at something is to do it. This IS a skill which can always use practicing.
How To Draw A Cube In 2 Point Perspective
Source: https://artwithmark.wordpress.com/two-point-perspective/

Komentar
Posting Komentar